The Risk Rancher Field Manual, Ch. 4: Casting the Net
Part of The Risk Rancher Field Manual, a hands-on guide to starting, scaling, and running a vulnerability management program.
Now you turn on the machine that finds the holes. But a scanner is not one thing. It is a whole category of tools, and the two ways people get this wrong are buying the one that does not fit their estate, or buying all of them at once and drowning. The goal is coverage of what matters, not maximum noise. You already did the hard part in chapter two: you know your crown jewels. Now you pick the net that actually covers them.
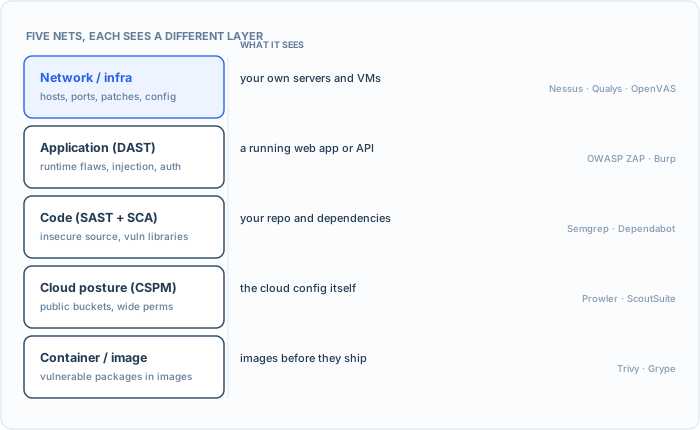
Five nets, each covering a different layer. Match the net to the herd instead of buying all five.
The kinds of nets
Each scanner type looks at a different layer. You want the ones that touch your important assets, and you can safely ignore the rest for now.
- Network and infrastructure scanners (Nessus, Qualys, OpenVAS). The classic. Point them at a range of addresses and they find out-of-date software, open ports, weak configuration, missing patches. These matter most when you run your own servers.
- Application scanners, or DAST. Point them at a running web app or API and they probe it for the flaws that only show up at runtime: injection, broken authentication, exposed data.
- Code and dependency scanners, SAST and SCA. These read your own source and your third-party libraries for insecure patterns and known CVEs. They live in your build pipeline. The developer side of this is a book of its own; see Ship, Securely.
- Cloud posture, or CSPM. These scan the cloud configuration itself: public storage buckets, wide-open security groups, over-broad permissions. In a cloud shop, this one usually catches more real risk than a network scan ever will.
- Container and image scanners. These check the images you ship for vulnerable packages before they reach production.
You do not need all of these on day one, and you may never need some of them. A SaaS company running on a cloud provider needs cloud posture, application, and dependency scanning long before it needs a network scanner for a datacenter it does not own. Match the net to the herd.
How to pick one
The vendor demos will all drown you in a feature list and a number of “detections.” Ignore almost all of it. Two things actually matter.
The first is an API. If you cannot pull findings out of the tool programmatically, you will be exporting spreadsheets by hand for the rest of your natural life, and the whole program will choke at the export step. A scanner without a usable API is a scanner you will quietly stop using. Make it a hard requirement.
The second is signal, not volume. A scanner that finds everything and is wrong a third of the time is worse than one that finds less and is right every time, because every false positive you forward is a withdrawal from the trust account you opened with IT in chapter three. The vendor selling “the most detections” is selling you noise with a bow on it. Run a trial against a system you know cold, and count how often the tool lies to you. Buy the one that lies least.
One technical tip that is worth more than any vendor choice: where you can, scan credentialed. A scanner logged in with real access sees the actual installed versions and config; a scanner guessing from the outside produces a fog of maybes. The difference in accuracy, and in false positives, is enormous.
Try it (optional, for real). If you would rather carry your own messy findings than the one this book ships, and you have Trivy handy, scan a deliberately vulnerable image:
trivy image --format json -o findings.json python:3.4-alpine. That old image is full of known CVEs on purpose, so you get a real export with real duplicates and real noise to work through the rest of the book (convert the JSON to the book’s columns, or just read it to see what raw scanner output honestly looks like). No scanner, or air-gapped? Use sample-findings.csv; the triage moves are identical either way.
Straight talk. The moment you turn a scanner on, you are going to drown, and that is not a problem anyone can sell you out of. It is just what scanning is: one tool across a modest estate will hand you thousands of findings, most of them duplicates, noise, or purely theoretical. What Risk Rancher does, for free, is take that export or API feed and do the unglamorous part, deduplicate it, group it by asset, and let you set the adjusted severity for your real environment, which is all of chapter six. You can do every bit of that in a spreadsheet by hand. The tool just does it in seconds instead of an afternoon, so you spend your time deciding instead of sorting.
How much coverage?
The instinct, once you have a scanner, is to scan everything, all the time, at maximum depth. Resist it. That is how you recreate the flood you are trying to escape.
Scan your crown jewels thoroughly and on a regular schedule, because those are the things that would actually end you. Scan the wider estate more shallowly and less often, enough to catch the obvious and the newly exposed. Deep coverage of the critical twenty percent beats shallow coverage of everything, and it produces a pile of findings a human can actually work through. Coverage is a budget. Spend it where the risk is.
A scanner casts a wide, shallow net, and for most of your findings that is exactly right. But some risks only a human will ever find, the business-logic flaw, the clever chain of three small things into one big one. For those you need someone to dive deep in one spot. Next: pentesters, and how not to waste fifteen thousand dollars on one.